SpringMVC详解(一) 简介 概念 SpringMVC就是我们常说的SSM中的“S”。
SSM(Spring+SpringMVC+MyBatis)框架集由Spring、MyBatis两个开源框架整合而成(SpringMVC是Spring中的部分内容)。常作为数据源较简单的web项目的框架。
但是现在的SSM也可以看作为是SpringBoot+SpringMVC+MyBatis。毕竟Spring和SpringBoot并不具有本质上的区别,它们的核心IOC和AOP,还是一样的。
虽然之前在讲使用MyBatis和REST风格的时候,有提到的MVC的使用,但是总体而言并不具体,于是,这次我们就分两篇来说一说SpringMVC的使用和深入。
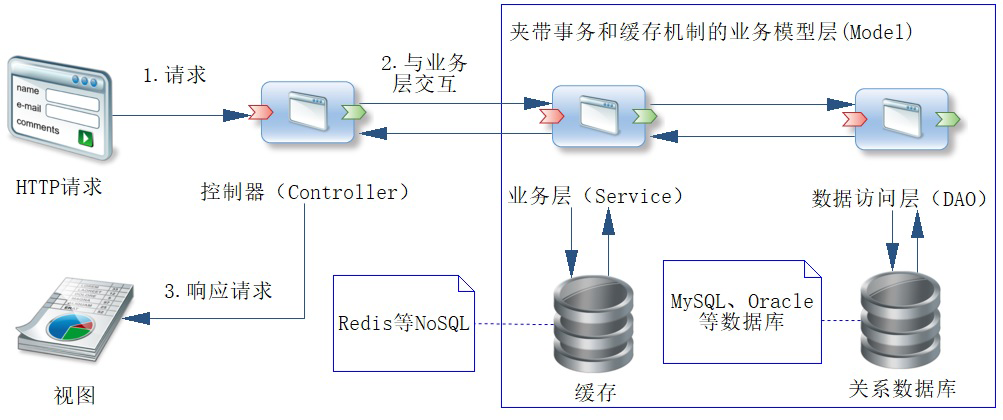
SpringMVC框架设计 先看一下框架流程图:
每当有请求从页面发出来之后,就会从控制层进去,这里的控制层和前端还存在着一定程度的耦合,它们必须要知道各自的请求地址是什么。然后由控制层进入到后端,完成对业务的处理。
SpringMVC流程 DispatcherServlet SpringMVC的框架设计并不复杂,其实只要多看看程序,稍微思考一下,也很容易的出它们的规律。
所有SpringMVC最关键的则是它们的内部流程,内部流程被SpringMVC的隐藏,很多时候你知道如何使用了,但是还是不知道内部的细节流程。我们就来学习一下吧。
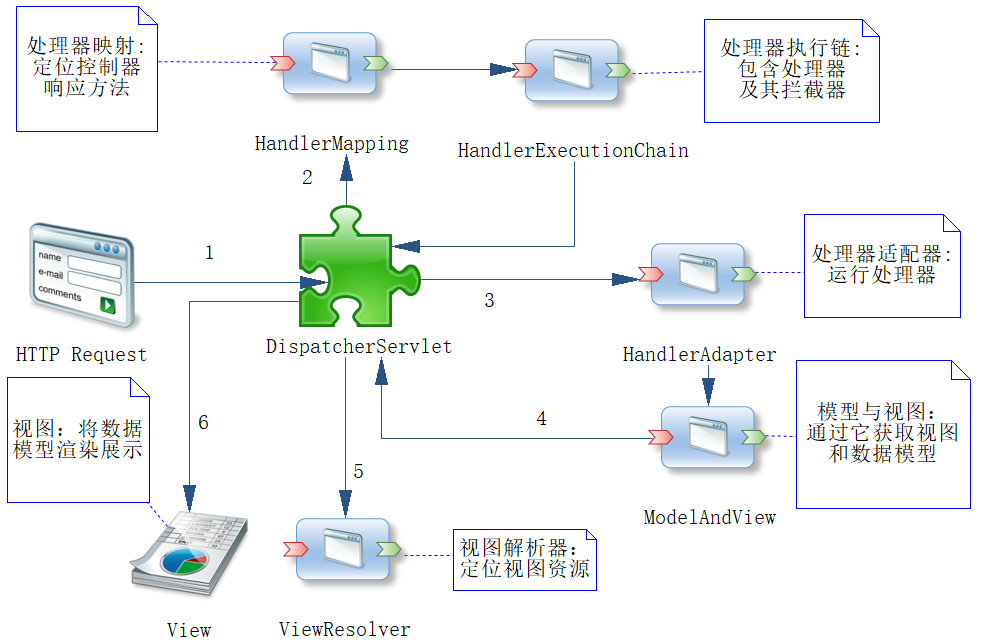
流程和组件是SpringMVC的核心,SpringMVC的流程是围绕DispatcherServlet而工作的,所以在SpringMVC中,patcherServlet就其最重要的内容。在DispatcherServlet的基础上,还存在其他的组件,掌握流程和组件就是SpringMVC开发的基础。
如图:
它是SpringMVC运行的全流程,其中图中的阿拉伯数字是其执行的流程,这是SpringMVC开发的基础。但是严格地说,SpringMVC处理请求并非一定需要经过全程,有时候一些流程并不存在。例如,在我们加入@ResponseBody时,是没有经过视图解析器和视图渲染的。
这里我们先看一个简单的实例,对这个流程做更进一步论述。首先,在Web服务器启动的过程中,如果在SpringBoot机制下启用SpringMVC,它就开始初始化一些重要的组件,如DispatcherServlet、HandlerAdapter的实现RequestMappingHandlerAdapter等组件对象。关于这些组件的初始化,我们可以看到spring-webmvc-xxx.jar包的属性文件DispatcherServlet.properti,它定义的对象都是在SpringMVC开始时就初始化,并且存放在SpringIoC容器中。
DispatcherServlet.properties 1 2 3 4 5 6 7 8 9 10 11 12 org.springframework.web.servlet.LocaleResolver = org . springframework.web.servlet.ilBn.AcceptHeade rLocaleResolver org.springframework.web.servlet.ThemeResolver =org.springframework.web.servlet.theme.FixedThemeResolver org.springframework.web.servlet.HandlerMapping =org.springframework.web.servlet.handler.BeanNameUrlHandlerMapping,\org.springframework.web.servlet.mvc.method.annotation.RequestMappingHandlerMapping org.springframework.web.servlet.HandlerAdapter =org.springframework.web.servlet.mvc.HttpRequestHandlerAdapter,\org.springframework.web.servlet.mvc.SimpleControllerHandlerAdapter,\org.springframework.web.servlet.mvc.method.annotation.RequestMappingHandlerAdapter org.springframework.web.servlet.HandlerExceptionResolver =org. springframework.web.servlet.mvc.method.annotation.ExceptionH andlerExceptionResolver #策略视图名称转换器,当你没有返回视图逻辑名称的时候,通过它可以生成默认的视图名称org.springframework.web.servlet.RequestToViewNameTranslator =org.springframework.web.servlet.view.DefaultRequestToViewNameTranslator #视图解析器org.springframework.web.servlet.ViewResolver =org.springframework.web.servlet.view.InternalResource飞liewResolver
基础依赖 我们在这里把所有基础依赖列出来,方便实验:
yml 1 2 3 4 5 6 7 8 9 10 11 12 13 14 15 16 17 18 mybatis: mapper-locations: classpath:/mapper/*.xml type-aliases-package: com.example.springmvc.pojo server: port: 8888 spring: datasource: username: root password: 123456 url: jdbc:mysql://localhost:3306/springtest?useSSL=false&serverTimezone=GMT%2B8&useUnicode=true&characterEncoding=utf8 driver-class-name: com.mysql.cj.jdbc.Driver tomcat: max-idle: 10 max-wait: 10000 max-active: 50 initial-size: 5 mvc: static-path-pattern: /static/**
dao 1 2 3 4 5 6 public interface UserDao User getUser (Long id) ; List<User> findUsers (@Param("userName" ) String userName, @Param ("note" ) String note) ; }
Service 1 2 3 4 5 6 7 8 9 10 11 12 13 14 15 16 17 18 @Service @Transactional public class UserServiceImpl implements UserService @Autowired private UserDao userDao = null ; @Override public User getUser (Long id) return userDao.getUser(id); } @Override public List<User> findUsers (String userName, String note) return userDao.findUsers(userName, note); } }
1 2 3 4 5 6 7 8 public interface UserService User getUser (Long id) ; List<User> findUsers (String userName, String note) ; }
Mapper 1 2 3 4 5 6 7 8 9 10 11 12 13 14 15 16 17 18 19 <?xml version="1.0" encoding="UTF-8" ?> <!DOCTYPE mapper PUBLIC "-//mybatis.org//DTD Mapper 3.0//EN" "http://mybatis.org/dtd/mybatis-3-mapper.dtd" > <mapper namespace ="com.example.springmvc.dao.UserDao" > <select id ="getUser" resultType ="user" > select id, user_name as userName, note from t_user where id = #{id} </select > <select id ="findUsers" resultType ="user" > select id, user_name as userName, note from t_user <where > <if test ="userName != null" > and user_name like concat('%', #{userName}, '%')</if > <if test ="note != null" > and note like concat('%', #{note}, '%')</if > </where > </select > </mapper
步骤详解 现在开始一步步的去解释这它们的运行流程。
首先需要一个控制层的控制器:
1 2 3 4 5 6 7 8 9 10 11 12 13 14 15 16 17 18 19 20 @Controller @RequestMapping ("/user" )public class UserController @Autowired private UserService userService = null ; @RequestMapping ("/details" ) public ModelAndView detailsForJson (Long id) User user = userService.getUser(id); System.out.println(user.getId()); ModelAndView mv = new ModelAndView(); mv.setViewName("details" ); mv.addObject("user" , user); return mv; } }
里的注解@Controller表明这是一个控制器,然后@RequestMapping代表请求路径和控制器(或其方法)的映射关系,它会在Web服务器启动SpringMVC时,就被扫描到HandlerMapping的机制中存储。
之后在用户发起请求被DispatcherServlet拦截后,通过URL和其他的条件,通过HandlerMapper机制就能找到对应的控制器(或其方法)进行响应。
只是通过HandlerMapping返回的是一个HandlerExecutionChain对象,这个对象的源码如:
1 2 3 4 5 6 7 8 9 10 11 12 13 14 15 public class HandlerExecutionChain private static final Log logger = LogFactory.getLog(HandlerExecutionChain.class ) ; private final Object handler; @Nullable private HandlerInterceptor[] interceptors; @Nullable private List<HandlerInterceptor> interceptorList; private int interceptorIndex; ...... }
源码中可以看出,HandlerExecutionChain对象包含个处理器(handler)。这里的处理器是对控制器(controller)的包装,因为我们的控制器方法可能存在参数,那么处理器就可以读入HTTP和上下文的相关参数,然后再传递给控制器方法。
而在控制器执行完成返回后,处理器又可以通过配置信息对控制器的返回结果进行处理。从这段描述中可以看出,处理器包含了控制器方法的逻辑,此外还有处理器的拦截器(interceptor),这样就能够通过拦截处理器进一步地增强处理器的功能得到了处理器(handler),还需要去运行,但是我们有普通HTTP请求,也有按BeanName的请求,甚至是WebSocket的请求,所以它还需要一个适配器去运行HandlerExecutionChain对象包含的处理器,这就是HandlerAdapter接口定义的实现类。
在DispatcherServlet.properties中,我们可以看到在SpringMVC中最常用的HandlerAdapter的实现类,这便是HttpRequestHandlerAdaptero通过请求的类型,DispatcherServlet就会找到它来执行Web请求的HandlerExecutionChain对象包含的内,这样就能够执行我们的处理器(handler)了。
只是HandlerAdapter运行HandlerExecutionChain对象这还比较复杂,我们这里暂时不进行深入讨论,放到后面再谈。
在处理器调用控制器时,它首先通过模型层得到数据,再放入数据模型中,最后将返回模型和视图(ModelAndView)对象,这里控制器设置的视图名称设置为“user/details”,这样就走到了视图解析器(ViewResolver),去解析视图逻辑名称了。
测试 需要一个页面,使用thymeleaf语法:
1 2 3 4 5 6 7 8 9 10 11 12 13 14 15 16 17 18 19 20 21 22 23 24 25 26 27 <!DOCTYPE html > <html lang ="en" xmlns:th ="http://www.thymeleaf.org" > <head > <meta charset ="UTF-8" > <title > Title</title > </head > <body > <table border ="1" > <tr > <td > 标签</td > <td > 值</td > </tr > <tr > <td > 用户编号</td > <td th:text ="${user.id}" > </td > </tr > <tr > <td > 用户名称</td > <td th:text ="${user.userName}" > </td > </tr > <tr > <td > 用户备注</td > <td th:text ="${user.note}" > </td > </tr > </table > </body > </html >
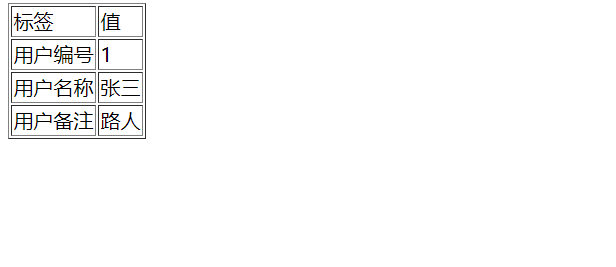
好了,开始测试吧:
效果图:
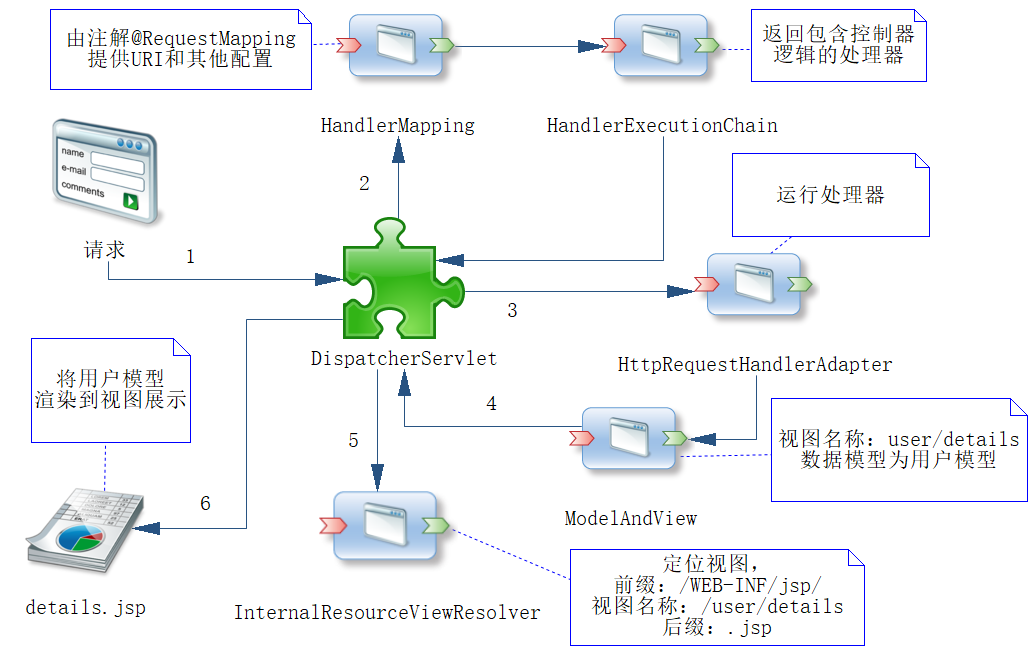
测试结果貌似不能直接说明出什么,我们再根据一张图,将它们结合到一起去理解它们是怎么运行的:
这便是它们的运行步骤。这里有添加jsp视图映射,但是我们使用的是thymeleaf,所以不会过度理会第五步,由于找不到合适的图,拿这个代替一下。
JSON视图 我们知道,一般前端的需求都是JSON 数据,这里是通过了SpringMVC的内置机制,自动将它转化为的JSON视图,我们可以自己定义转换为JSON数据,来保证不会出错:
1 2 3 4 5 6 7 8 9 10 11 12 13 @RequestMapping ("/detailsForJson" )public ModelAndView detailsForJson (Long id) User user = userService.getUser(id); ModelAndView mv = new ModelAndView(); MappingJackson2JsonView jsonView = new MappingJackson2JsonView(); mv.setView(jsonView); mv.addObject("user" , user); return mv; }
效果也如图所示:
定制SpringMVC初始化 如SpringBoot所承诺的那样,它会尽可能地配置Spring,对于SpringMVC也是如此,但是无论如何这些配置都可能满足不了我们的需要,需要进一步地对SpringMVC定制。
在S巳rvlet3.0范中,web刀nl再也不是一个必需的配置文件。为了适应这个规范,SpringMVC从3.1版本开始也进行了支持,也就是我们已经不再需要通过任何XML去配置SpringMVC的运行环境,正如SpringBoot的宗旨,消除XML的繁杂配置。
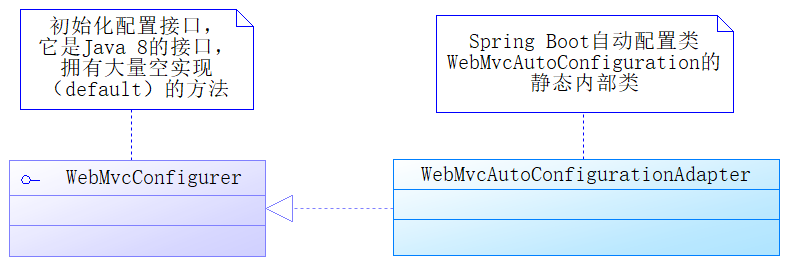
为了支持对于SpringMVC的配置,Spring提供了接口WebMvcConfigurer这是一个基于Java8的接口,所以其大部分方法都是default类型的,但是它们都是空实现,这样开发者只需要实现这个接口,重写需要自定义的方法即可,这样就很方便进行开发了。
在SpringBoot中,自定义是通过配置类WebMvcAutoConfiguration定义的,它有一个静态的内部类WebMvcAutoConfigurationAdapter通过它SpringBoot就自动配置了SpringMVC的初始化,如图:
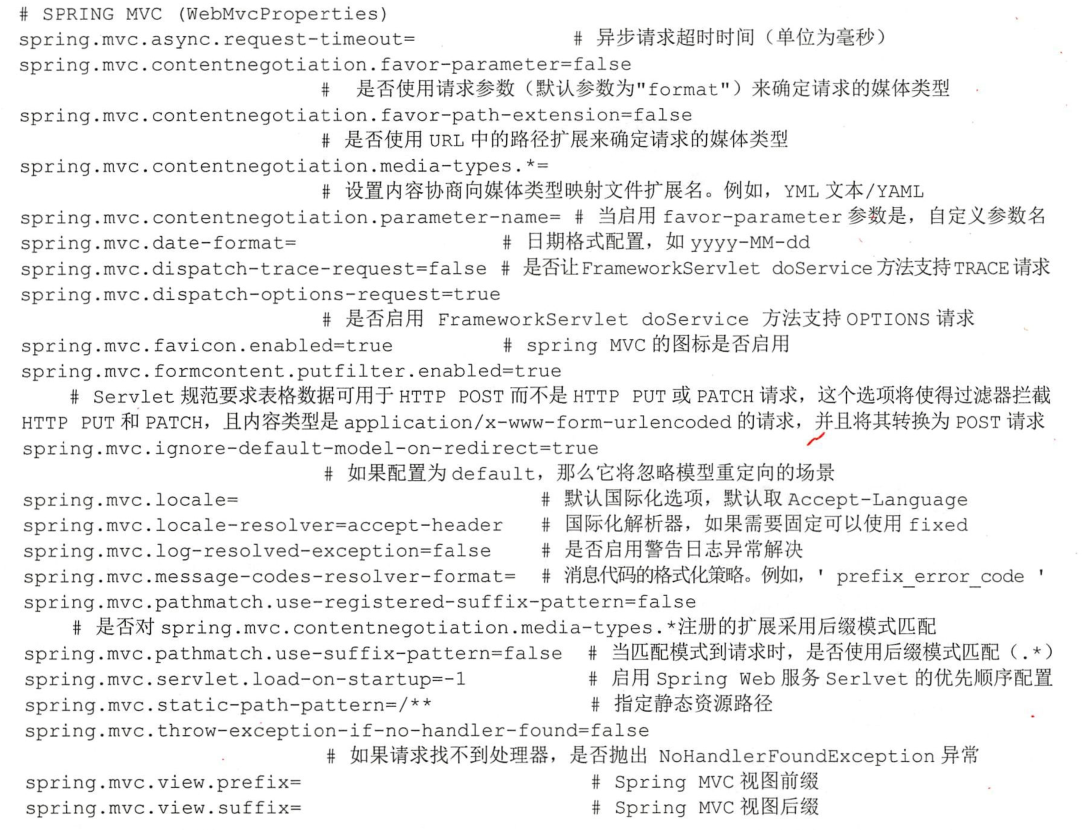
SpringMVC可配置项
这些配置项将会被SpringBoot的机制读入,然后使用ebMvcAutoConfigurationAdapter去定制初始化。
一般而言,我们只需要配置少数的选项就能够使得SpringMVC工作了。
SpringMVC实例 在SpringBoot中开发SpringMVC还是比较简易的,正如之前我们的例子,SpringVC的开发核心是控制器的开发,控制器的开发又分为这么几个步骤,首先是定义请求分发,SpringMVC能够产生HandlerMapping,其次是接收请求获取参数,再次是处理业务逻辑获取数据模型,最后是绑定视图和数据模型。
视图将数据模型渲染则是视图定义的问题,不属于控制器开发的步骤。
下面我们演示一个用户列表查询的界面。假设可以通过用户名称CuserName)和备注(note)进行查询,但是一开始进入页面需要载入所有的数据展示给用户查看。
这里分为两种常见的场景,一种是刚进入页面时,一般来说是不允许存在异步请求的,因为异步请求会造成数据的刷新,对用户不友好:另一种是进入页面后的查询,这时可以考虑使用Ajax异步请求,只刷新数据而不刷新页面,这才是良好的UI体验设计。
控制层 贴出控制层代码:
1 2 3 4 5 6 7 8 9 10 11 12 13 14 15 16 17 18 19 20 21 22 23 24 25 26 27 28 29 30 31 32 33 34 35 36 37 38 39 40 41 42 43 44 45 46 47 48 49 50 51 52 53 54 55 56 57 58 59 60 61 62 63 64 65 66 67 68 69 70 import com.example.springmvc.pojo.User;import com.example.springmvc.service.UserService;import org.springframework.beans.factory.annotation.Autowired;import org.springframework.stereotype.Controller;import org.springframework.web.bind.annotation.RequestMapping;import org.springframework.web.bind.annotation.RequestParam;import org.springframework.web.bind.annotation.ResponseBody;import org.springframework.web.servlet.ModelAndView;import org.springframework.web.servlet.view.json.MappingJackson2JsonView;import java.util.List;@Controller @RequestMapping ("/user" )public class UserController @Autowired private UserService userService = null ; @RequestMapping ("/details" ) public ModelAndView details (Long id) User user = userService.getUser(id); ModelAndView mv = new ModelAndView(); mv.setViewName("details" ); mv.addObject("user" , user); return mv; } @RequestMapping ("/detailsForJson" ) public ModelAndView detailsForJson (Long id) User user = userService.getUser(id); ModelAndView mv = new ModelAndView(); MappingJackson2JsonView jsonView = new MappingJackson2JsonView(); mv.setView(jsonView); mv.addObject("user" , user); return mv; } @RequestMapping ("/table" ) public ModelAndView table () List<User> userList = userService.findUsers(null , null ); ModelAndView mv = new ModelAndView(); mv.setViewName("table" ); mv.addObject("userList" , userList); return mv; } @RequestMapping ("/list" ) @ResponseBody public List<User> list (@RequestParam(value = "userName" , required = false ) String userName, @RequestParam (value = "note" , required = false ) String note) { List<User> userList = userService.findUsers(userName, note); return userList; } }
这就是控制层,其实并没有什新的东西,按照已有的知识重复写就能够写出来。
Html页面 1 2 3 4 5 6 7 8 9 10 11 12 13 14 15 16 17 18 19 20 21 22 23 24 25 26 27 28 29 30 31 32 33 34 35 36 37 38 39 40 41 42 43 44 45 46 47 48 49 50 51 52 53 54 55 56 57 58 59 60 61 62 63 64 65 66 67 68 69 70 71 72 73 74 75 76 77 78 79 80 81 82 83 <!DOCTYPE html > <html lang ="en" xmlns:th ="http://www.thymeleaf.org" > <head > <meta charset ="UTF-8" > <title > 用户列表</title > <link rel ="stylesheet" type ="text/css" href ="../static/easyui/themes/default/easyui.css" > <link rel ="stylesheet" type ="text/css" href ="../static/easyui/themes/icon.css" > <link rel ="stylesheet" type ="text/css" href ="../static/easyui/demo/demo.css" > <script type ="text/javascript" src ="../static/easyui/jquery.min.js" > </script > <script type ="text/javascript" src ="../static/easyui/jquery.easyui.min.js" > </script > <script type ="text/javascript" > function onSearch () var opts = $('#dg' ).datagrid("options" ); opts.url = "./list" ; var userName = $("#userName" ).val(); var note = $("#note" ).val(); var params = {}; if (userName != null && userName.trim() != '' ) { params.userName = userName; } if (note != null && note.trim() != '' ) { params.note = note; } $("#dg" ).datagrid('load' , params); } </script > </head > <body > <div style ="margin: 20px 0;" > </div > <div class ="easyui-layout" style ="width: 100%; height: 350px;" > <div data-options ="region:'north'" style ="height: 50px" > <form id ="searchForm" method ="post" > <table > <tr > <td > 用户名称:</td > <td > <input id ="userName" name ="userName" class ="easyui-textbox" data-options ="prompt:'输入用户名称...'" style ="width: 100%; height: 32px" > </td > <td > 备注</td > <td > <input id ="note" name ="note" class ="easyui-textbox" data-options ="prompt:'输入备注...'" style ="width: 100%; height: 32px" > </td > <td > <a href ="#" class ="easyui-linkbutton" data-options ="iconCls:'icon-search'" style ="width: 80px" onclick ="onSearch()" > 查询</a > </td > </tr > </table > </form > </div > <div data-options ="region:'center',title:'用户列表',iconCls:'icon-ok'" > <table id ="dg" class ="easyui-datagrid" , data-options ="border:false,singleSelect:true, fit:true,fitColumns:true" > <thead > <tr > <th data-options ="field:'id'" width ="80" > 编号</th > <th data-options ="field:'userName'" width ="100" > 用户名称</th > <th data-options ="field:'note'" width ="80" > 备注</th > </tr > </thead > <tbody > <tr th:each ="u:${userList}" > <td th:text ="${u.id}" > id</td > <td th:text ="${u.userName}" > userName</td > <td th:text ="${u.note}" > note</td > </tr > </tbody > </table > </div > </div > </body > </html >
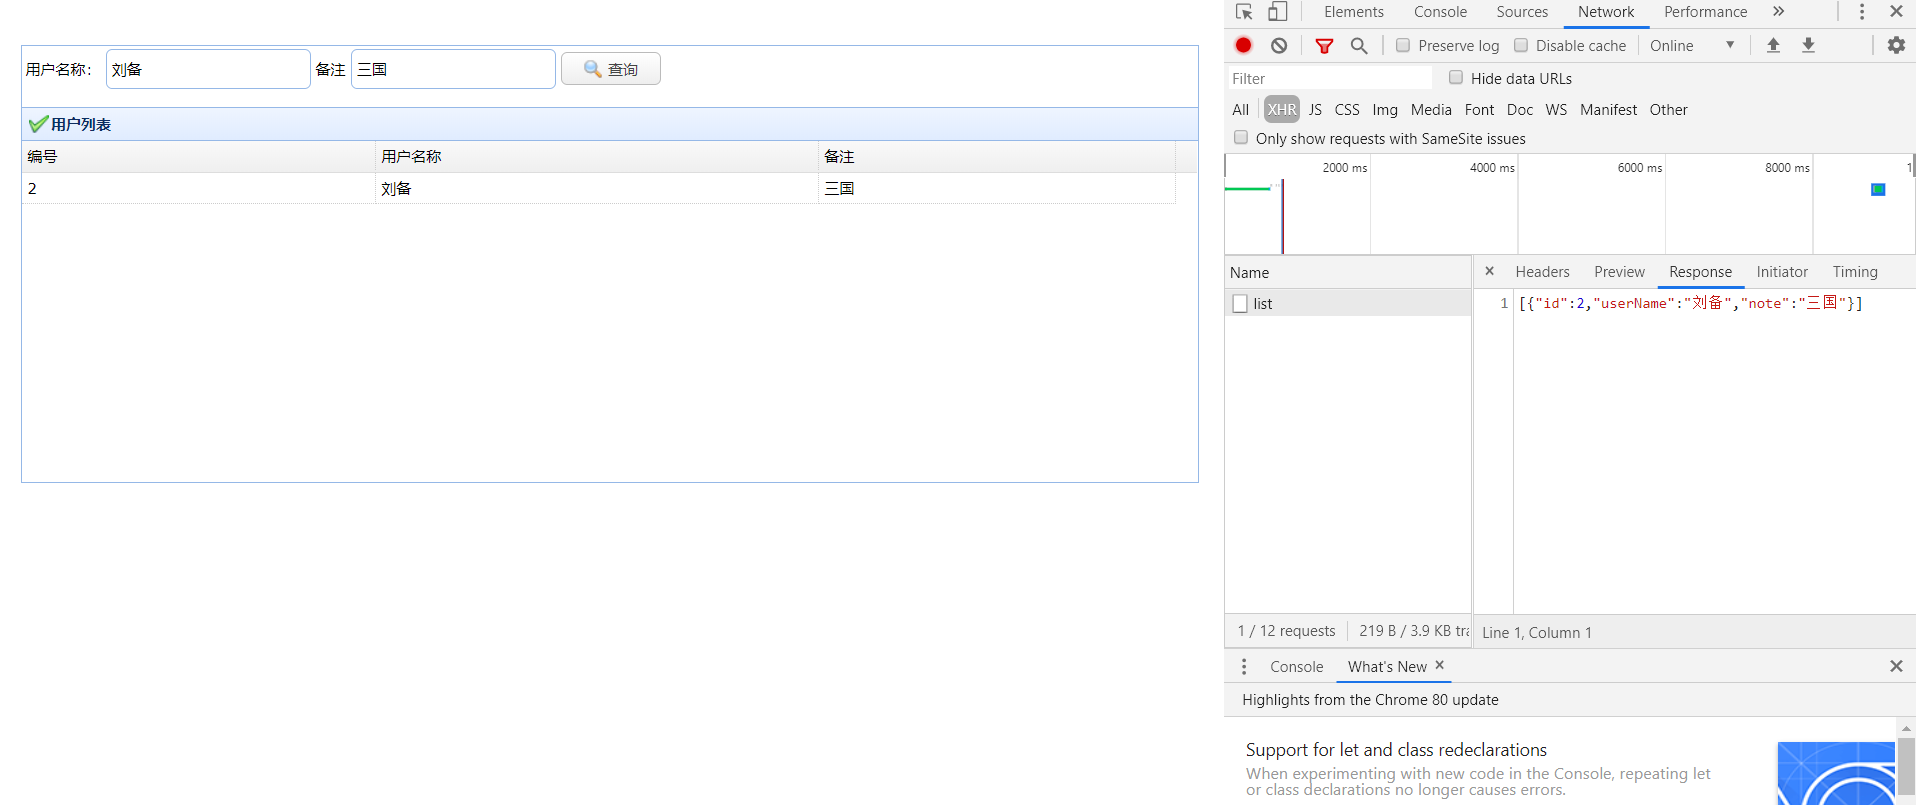
页面中还定义了两个文本框,用来输入用户名和各注,然后通过查询按钮进行询。这里查询按钮的点击事件定义为onSearch,这样就能够找到onSearch函数来执行查询。
在这个函数中,首先定义DataGrid请求的URL,它指向了list方法,然后通过jQuery去获取两个文本框的参数值,再通过DataGrid的load方法,传递参数去后端查询,得到数据后重新载入DataGrid的数据,这样DataGrid就能够得到查询的数据了。
再看回list方法。首先它标注为了@ResponseBody,这样SpringMVC就道最终需要把返回的结果转换为JSON。然后是获取参数,这里使用了注解@RequestParam,通过指定参数名称使得HTTP请求的参数和方法的参数进行绑定,只是这个注解的默认规则是参数不能为空。为了克服这个问题,代码将其属性required设置为false即可,其意义就是允许参数为空。这样就可以测试这个请求了
最后再测试一下吧: