Thymeleaf
在下在此奉劝大家,不要再学JSP了。
简介
Thymeleaf的概念:
Thymeleaf是适用于Web和独立环境的现代服务器端Java模板引擎。
Thymeleaf的主要目标是为您的开发工作流程带来优雅的自然模板 -HTML可以在浏览器中正确显示,也可以作为静态原型工作,从而可以在开发团队中加强协作。
可以在Web(基于servlet )和非Web环境中工作。 它更适合在基于MVC的Web应用程序的视图层提供XHTML / HTML5,但它甚至可以在脱机环境中处理任何XML文件。 它提供完整的Spring Framework。
在Web应用程序中,Thymeleaf旨在成为JavaServer Pages (JSP)的完全替代品,并实现自然模板的概念:模板文件可以直接在浏览器中打开,并且仍然可以正确显示为网页。
对了,Thymeleaf取代了JSP。
功能
用于XML , XHTML和HTML5的 Java 模板引擎 。
适用于Web和非Web(离线)环境。 没有硬依赖Servlet API。
基于称为
方言的
模块化特征集。
- 方言特征(例如:评估,迭代等)通过将它们链接到模板的标签和/或属性来应用。
- 开箱即用的两种方言:Standard和SpringStandard(适用于Spring MVC应用程序,与标准语法相同)。
- 开发人员可以扩展和创建自定义方言。
几种模板模式:
完整(和可扩展)的国际化支持。
可配置的高性能解析模板缓存 ,可将输入/输出降至最低。
自动DOCTYPE转换 - 从模板DTD到结果DTD-用于(可选)验证模板和结果代码。
极易扩展:如果需要,可以用作模板引擎框架。
完整的文档,包括几个示例应用。
常用场景
Thymeleaf现在经常和Spring组件一起,成为一个完整的SSM框架。
SSM:
Spring
Spring就像是整个项目中装配bean的大工厂,在配置文件中可以指定使用特定的参数去调用实体类的构造方法来实例化对象。也可以称之为项目中的粘合剂。
Spring的核心思想是IoC(控制反转),即不再需要程序员去显式地new一个对象,而是让Spring框架帮你来完成这一切。
SpringMVC
SpringMVC在项目中拦截用户请求,它的核心Servlet即DispatcherServlet承担中介或是前台这样的职责,将用户请求通过HandlerMapping去匹配Controller,Controller就是具体对应请求所执行的操作。SpringMVC相当于SSH框架中struts。
mybatis
mybatis是对jdbc的封装,它让数据库底层操作变的透明。mybatis的操作都是围绕一个sqlSessionFactory实例展开的。mybatis通过配置文件关联到各实体类的Mapper文件,Mapper文件中配置了每个类对数据库所需进行的sql语句映射。在每次与数据库交互时,通过sqlSessionFactory拿到一个sqlSession,再执行sql命令。
到现在,新一代的SSM定义应该为SpringBoot+SpringMVC+MyBatis。
于是,现在开始学习关于SpringMVC的知识。
常用的方法
Thymeleaf有很多的语法,虽然一个一个列出来并不复杂,但是为了更好的去理解它们的使用,而不是仅仅的列出公式。我希望能够将常用的抽离出来,并且将它们整合为一个项目。然后再单独的讲一下不常用的。
基本准备
引入依赖
1
2
3
4
| <dependency>
<groupId>org.springframework.boot</groupId>
<artifactId>spring-boot-starter-thymeleaf</artifactId>
</dependency>
|
为了更好的完成视图的开发,一般会多引入一个依赖:
1
2
3
4
5
6
| <dependency>
<groupId>org.springframework.boot</groupId>
<artifactId>spring-boot-devtools</artifactId>
<scope>runtime</scope>
<optional>true</optional>
</dependency>
|
这是开发工具,能够实时的在网页上查看更改的效果,实现边改边看。
配置
1
2
3
| spring:
thymeleaf:
cache: false
|
关闭缓存,实现实现边改边看。
各个类的准备
实体类
1
2
3
4
5
6
7
8
9
10
11
| @Data
@Alias("product")
public class Product implements Serializable {
private static final long serialVersionUID = 3288311147760635602L;
private Long id;
private String productName;
private int stock;
private double price;
private int version;
private String note;
}
|
Dao层
1
2
3
4
5
6
7
8
9
10
11
| @Data
@Alias("product")
public class Product implements Serializable {
private static final long serialVersionUID = 3288311147760635602L;
private Long id;
private String productName;
private int stock;
private double price;
private int version;
private String note;
}
|
服务层
1
2
3
4
5
6
7
8
9
10
11
12
13
14
| public interface ProductService {
List<Product> ShowAll();
int delete(Long id);
int add(Product product);
}
|
1
2
3
4
5
6
7
8
9
10
11
12
13
14
15
16
17
18
19
20
21
| @Service
public class ProductServiceImpl implements ProductService {
@Autowired
private ProductDao productDao;
@Override
public List<Product> ShowAll() {
return productDao.showProduct();
}
@Override
public int delete(Long id) {
return productDao.deleteProduct(id);
}
@Override
public int add(Product product) {
return productDao.addProduct(product);
}
}
|
Mapper
1
2
3
4
5
6
7
8
9
10
11
12
13
14
15
16
17
18
19
20
21
22
| <?xml version="1.0" encoding="UTF-8" ?>
<!DOCTYPE mapper
PUBLIC "-//mybatis.org//DTD Mapper 3.0//EN"
"http://mybatis.org/dtd/mybatis-3-mapper.dtd">
<mapper namespace="com.example.thymeleaf.dao.ProductDao">
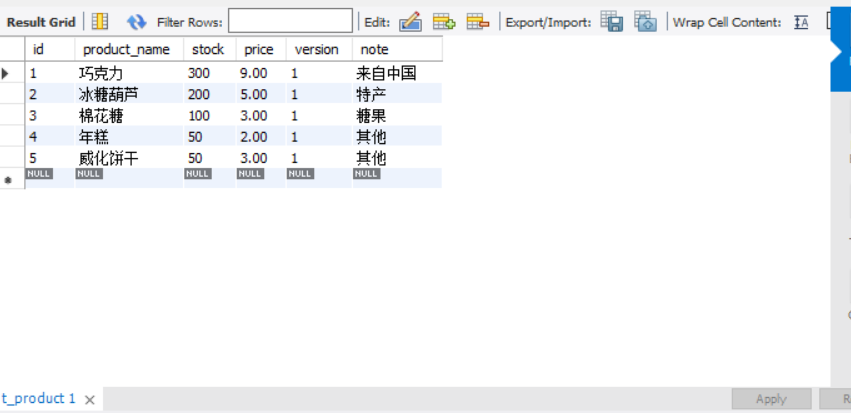
<select id="showProduct" resultType="product">
select * from t_product
</select>
<insert id="addProduct" useGeneratedKeys="true" keyProperty="id"
parameterType="product">
insert into t_product(product_name, stock,price,version,note)
values(#{productName},#{stock},#{price},#{version},#{note})
</insert>
<delete id="deleteProduct" parameterType="long">
delete from t_product where id = #{id}
</delete>
</mapper>
|
控制层
1
2
3
4
5
6
7
8
9
10
11
12
| @Controller
public class ProductController {
@Autowired
private ProductService productService;
@RequestMapping("/index")
public String index(Model model){
model.addAttribute("products", productService.ShowAll());
return "index";
}
}
|
开始测试
首先要准备一个index页面,并且在顶部添上一句:
1
| <html lang="en" xmlns:th="http://www.thymeleaf.org">
|
这样HTML页面便能够识别我们的Thymeleaf语法。
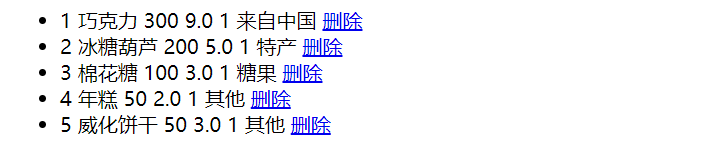
th:each
th:each 是一个经常被使用的语法,它能够不断地去读取从后端发出的队列,并且显示出来。
1
2
3
4
5
6
7
8
9
10
11
12
13
14
15
|
<ul>
    <li th:each="product:${products}">
        <span th:text="${product.id}">id</span>
        <span th:text="${product.productName}">产品名称</span>
        <span th:text="${product.stock}">库存</span>
        <span th:text="${product.price}">价格</span>
        <span th:text="${product.version}">版本</span>
        <span th:text="${product.note}">备注</span>
        <a th:href="@{deletelist/{id}(id=${product.getId()})}"
           th:value="${product.getId()}"
           onclick="return del()"
           type="submit">删除</a>
    </li>
</ul>
|
它会将我们从数据库中读取到的数据量的多少,来显示我们的页面。
我们在添加信息的时候,首先会在index页面添加一个:
它能够发起一个add请求到后端:
1
2
3
4
5
6
| @RequestMapping("/add")
public String add(Model model){
Product product=new Product();
model.addAttribute("product",product);
return "add";
}
|
后端接收到了这个请求后,就会使用return到另一个页面,值得注意的是,我们这里又new了一个新的product,之所以这样做是为了能够add页面,使用product这个类。
1
2
3
4
5
6
7
8
9
10
| <form action="#" th:action="@{/addproduct}" th:object="${product}" method="post">
<input type="text" th:field="*{id}" />
<input type="text" th:field="*{productName}" />
<input type="text" th:field="*{stock}" />
<input type="text" th:field="*{price}" />
<input type="text" th:field="*{version}" />
<input type="text" th:field="*{note}" />
<input type="submit">
</form>
|
这个就是我们的提交表单的行为,这里的th:action表示这个表单将会提交到:/addproduct 这个链接的方法中。
这里使用th:object去定义要使用的实例,我们就能够再text框中输入实例的属性,以此决定我们实例的数据。
使用th:field去表示这是我们实例的哪个属性。
java
1
2
3
4
5
| @RequestMapping(value = "/addproduct",method = RequestMethod.POST)
public String addpro(@ModelAttribute Product product){
productService.add(product);
return "redirect:/add";
}
|
这个请求就是表单提交的链接的方法,会使用服务的方法区增加信息。最后哪个redirect:/add ,表示需要重定向到链接add,重新执行add链接下的方法。
删除信息
写一个删除信息的页面,再添加:
html
1
2
3
4
5
| <form action="#" th:action="@{/deleteproduct}" th:object="${product}" method="post">
<input type="text" th:field="*{id}" />
<input type="submit">
</form>
|
会根据id去删除数据库的信息,这个也是一个表单,和add类似,使用表单的好处是以后更方便的用于修改。
1
2
3
4
5
6
7
8
9
10
11
12
| @RequestMapping("/delete")
public String delete(Model model){
Product product=new Product();
model.addAttribute("product",product);
return "delete";
}
@RequestMapping(value = "/deleteproduct",method = RequestMethod.POST)
public String deletepro(@ModelAttribute Product product){
productService.delete(product.getId());
return "redirect:index";
}
|
这里设置为重定向到index。
使用按钮删除信息
实际在后端管理中,为了更方便的去增删改查。很多时候都是使用链接去完成的。回看index页面
1
2
3
4
5
6
7
8
9
10
11
12
13
14
| <ul>
<li th:each="product:${products}">
<span th:text="${product.id}">id</span>
<span th:text="${product.productName}">产品名称</span>
<span th:text="${product.stock}">库存</span>
<span th:text="${product.price}">价格</span>
<span th:text="${product.version}">版本</span>
<span th:text="${product.note}">备注</span>
<a th:href="@{deletelist/{id}(id=${product.getId()})}"
th:value="${product.getId()}"
onclick="return del()"
type="submit">删除</a>
</li>
</ul>
|
这里使用在最后的时候使用了一个 a 标签,表示这是一个链接。th:href 里面表示的是链接值,链接值的id,使用了REST风格的形式。
onclick则是表达点击下去会发生什么。这里运用了js的知识,返回了一个函数del(),看一下这个del函数:
1
2
3
4
5
6
7
8
9
10
11
| <script type="text/javascript"
src="https://code.jquery.com/jquery-3.2.1.min.js"></script>
<script type="text/javascript">
function del() {
if (confirm("您确定要删除吗?")) {
return true;
} else {
return false;
}
}
</script>
|
它会显示:你是否确定点击这个链接,是则返回true,否则返回false。


展示单个产品
先添加xml:
1
2
3
| <select id="getProduct" resultType="product">
select * from t_product where product_name=#{name}
</select>
|
然后添加dao层和服务层相应的操作,并再往控制层加上:
1
2
3
4
5
| @RequestMapping("/showpro/{p}")
public String showpro(@PathVariable("p") String product,Model model){
model.addAttribute("product",productService.get(product));
return "show";
}
|
这里会接收到从index页面传入的产品名称,并且访问数据库,读取出相应的数据
再更改html类型
1
2
3
4
| <a th:href="@{showpro/{p}(p=${product.getProductName()})}"
th:value="${product.getProductName()}"
type="submit"
th:text="${product.productName}">产品名称</a>
|
之后的改动都以此类推,多试几次,逻辑是很简单的。
产品分页
如果我们的产品有很多,想必就不能一口气全部展示出来,这个时候,就要实现分页功能。
首先要引入依赖:
1
2
3
4
5
6
|
<dependency>
<groupId>com.github.pagehelper</groupId>
<artifactId>pagehelper-spring-boot-starter</artifactId>
<version>1.2.3</version>
</dependency>
|
主要引入的依赖最好为这样由springboot自动注入的形式,而不是直接就引入pagehelpe的jar包。
然后在Controller层增加:
1
2
3
4
5
6
7
8
9
10
11
12
13
14
15
16
17
18
19
20
21
22
23
24
25
26
27
28
29
30
31
|
@RequestMapping("/page")
public String page(Model model,
@RequestParam(defaultValue = "1") Integer pageNum,
@RequestParam(defaultValue = "2") Integer pageSize)
{
PageHelper.startPage(pageNum, pageSize);
List<Product> products=productService.ShowAll();
PageInfo pageInfo = new PageInfo<Product>(products, 2);
model.addAttribute("pageInfo", pageInfo);
model.addAttribute("pageNum", pageInfo.getPageNum());
model.addAttribute("pageSize", pageInfo.getPageSize());
model.addAttribute("isFirstPage", pageInfo.isIsFirstPage());
model.addAttribute("totalPages", pageInfo.getPages());
model.addAttribute("isLastPage", pageInfo.isIsLastPage());
model.addAttribute("products", pageInfo.getList());
System.out.println(pageInfo.getList()+"");
return "index";
}
|
这里的做法比较浅显而且易读,首先由@RequestParam(defaultValue = “1”)去定义默认值,在默认的情况下先打开第一页,并且第一页有着两条信息。PageHelper.startPage则是指定,分页功能,使其在全局生效。而那些model的作用,是用来交接HTML页面的。
修改index.html页面:
1
2
3
4
5
6
7
8
9
10
11
12
13
14
15
16
17
18
19
20
21
22
23
24
25
26
27
28
29
30
31
32
33
34
35
36
37
38
39
40
41
42
43
44
45
46
47
48
49
50
51
52
53
54
55
56
57
58
59
60
61
62
63
64
65
66
67
68
69
70
| <!DOCTYPE html>
<html lang="en" xmlns:th="http://www.thymeleaf.org">
<head>
<meta charset="UTF-8">
<title>Title</title>
<script type="text/javascript"
        src="https://code.jquery.com/jquery-3.2.1.min.js"></script>
<script type="text/javascript">
    function del() {
        if (confirm("您确定要删除吗?")) {
            return true;
        } else {
            return false;
        }
    }
</script>
</head>
<body>
<ul>
<li th:each="product:${pageInfo.list}">
<span th:text="${product.id}">id</span>
<a th:href="@{showpro/{p}(p=${product.getProductName()})}"
th:value="${product.getProductName()}"
type="submit"
th:text="${product.productName}">产品名称</a>
<span th:text="${product.stock}">库存</span>
<span th:text="${product.price}">价格</span>
<span th:text="${product.version}">版本</span>
<span th:text="${product.note}">备注</span>
<a th:href="@{deletelist/{id}(id=${product.getId()})}"
th:value="${product.getId()}"
onclick="return del()"
type="submit">删除</a>
</li>
</ul>
<a href="add">增加产品</a>
<a href="delete">删除产品</a>
<ul class="pagination">
<li>
<a th:if="${not isFirstPage}" th:href="@{${'/page'}(pageNum=${pageNum-1},pageSize=${pageSize})}" aria-label="Previous">
<span aria-hidden="true">«</span>
</a>
<a th:if="${isFirstPage}" href="javascript:void(0);" aria-label="Previous">
<span aria-hidden="true">«</span>
</a>
</li>
<li th:each="pageNo : ${#numbers.sequence(1, totalPages)}">
<a th:if="${pageNum eq pageNo}" href="javascript:void(0);">
<span th:text="${pageNo}"></span>
</a>
<a th:if="${not (pageNum eq pageNo)}" th:href="@{${'/page'}(pageNum=${pageNo},pageSize=${pageSize})}">
<span th:text="${pageNo}"></span>
</a>
</li>
<li>
<a th:if="${not isLastPage}" th:href="@{${'/page'}(pageNum=${pageNum+1},pageSize=${pageSize})}" aria-label="Next">
<span aria-hidden="true">»</span>
</a>
<a th:if="${isLastPage}" href="javascript:void(0);" aria-label="Next">
<span aria-hidden="true">»</span>
</a>
</li>
</ul>
</body>
</html>
|
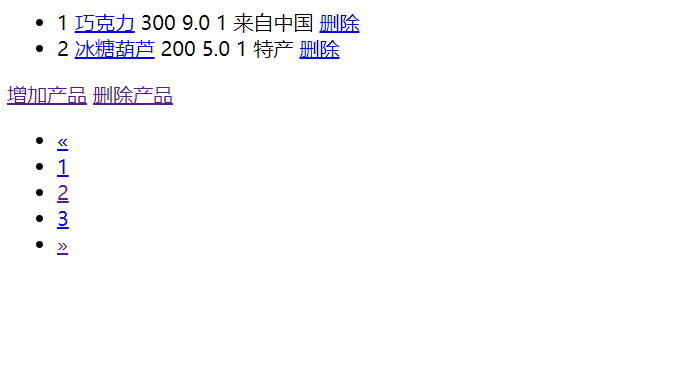
在index页面添加了有关于分页的信息,这里是使用了thymeleaf语法来完成和实现的。
th:if=”${not isFirstPage} 表示着如果存在isFirstPage,或者说不存在isFirstPage的值为真,那么将不会显示上一页,否则则显示。可能有点绕,简而言之,就是如果不为真为真,则XXX…….
然后就是如果为真,则显示href=”javascript:void(0);”,这表示着仍然是本页,不进行任何更改。
而中间的这段:
1
| <li th:each="pageNo : ${#numbers.sequence(1, totalPages)}">
|
则是表示中间还有多少页的意思。并且定位到相应的页面。
而之后的next,和previous差不多。它们所获取到的值,其实都是model里面的key-value值。
测试:
一些错误
前面的实验都是没有引入css和js的,如果要引入这些资源的话,css和js必须放在static目录下。
如果还是无法获得静态资源,那么就在application.yml中加入:
1
2
3
| spring:
mvc:
static-path-pattern: /static/**
|
强行扫描所有静态资源
标准表达式语法
变量表达式
我们使用${xxxxx},就是一个变量表达式,它能够获取从控制层中传入的Model。
选择表达式
*{xxxxxx},使用预先选择的对象来表达,可理解为是能够获取实例中的属性。
文字国际化表达式
文字国际化表达式允许我们从一个外部文件获取区域文字信息(.properties),用 Key 索引 Value,还可以提供一组参数(可选):
#{main.title}
#{message.entrycreated(${entryId})}
这个主要的做法是用于整个网站的字体或者语言文字转化。
URL表达式
@{XXXXX},能够把一个有用的上下文或者是回话信息添加到URL
表达式支持的语法
字面(Literals)
- 文本文字(Text literals): ‘one text’, ‘Another one!’,…
- 数字文本(Number literals): 0, 34, 3.0, 12.3,…
- 布尔文本(Boolean literals):true, false
- 空(Null literal):null
- 文字标记(Literal tokens):one, sometext, main,…
文本操作(Text operations)
- 字符串连接(String concatenation):+
- 文本替换(Literal substitutions):|The name is ${name}|
算术运算(Arithmetic operations)
- 二元运算符(Binary operators):+, -, *, /, %
- 减号(单目运算符)Minus sign (unary operator):-
布尔操作(Boolean operations)
- 二元运算符(Binary operators):and, or
- 布尔否定(一元运算符)Boolean negation (unary operator):!, not
比较和等价(Comparisons and equality)
- 比较(Comparators):>, <, >=, <= (gt, lt, ge, le)
- 等值运算符(Equality operators):==, != (eq, ne)
条件运算符(Conditional operators)
- If-then:(if) ? (then)
- If-then-else:(if) ? (then) : (else)
- Default: (value) ?:(defaultvalue)
方法表
源码地址:
https://github.com/Antarctica000/SpringBoot/tree/master/thymeleaf