SpringBoot整合Redis缓存 如果我们每次需要数据都要从数据库访问数据的话,会给数据库带来极大的压力,这时候,就需要一个地点暂时居住起来,这样就不会因为大量的IO导致效率低下。:happy:
Redis 简介 REmote DIctionary Server(Redis) 是一个由Salvatore Sanfilippo写的key-value存储系统。
Redis是一个开源的使用ANSI C语言编写、遵守BSD协议、支持网络、可基于内存亦可持久化的日志型、Key-Value数据库,并提供多种语言的API。
它通常被称为数据结构服务器,因为值(value)可以是 字符串(String), 哈希(Hash), 列表(list), 集合(sets) 和 有序集合(sorted sets)等类型。
简而言之就是一个高速的缓存器,我使用这个缓存器使在数据库中传入的数据,放入到一个缓存库中。这样,就不用每次需要数据,都连接一次数据库了。
加入依赖 pom.xml
1 2 3 4 5 6 7 8 9 10 11 12 13 14 15 16 17 18 19 20 <dependency > <groupId > org.springframework.boot</groupId > <artifactId > spring-boot-starter-data-redis-reactive</artifactId > <exclusions > <exclusion > <groupId > io.lettuce</groupId > <artifactId > lettuce-core</artifactId > </exclusion > </exclusions > </dependency > <dependency > <groupId > org.apache.commons</groupId > <artifactId > commons-pool2</artifactId > </dependency > <dependency > <groupId > redis.clients</groupId > <artifactId > jedis</artifactId > </dependency >
redis默认使用lettuce去连接,使用exclusions去排除,再加入jedis连接。当然,只加redis依赖也可以,只不过jedis比较受欢迎而已。
配置文件 1 2 3 4 5 6 7 8 9 10 11 12 13 14 15 16 17 18 19 20 21 22 23 24 25 26 27 28 29 30 31 32 33 34 35 36 37 38 39 40 server: port: 8888 mybatis: mapper-locations: classpath:/mapper/*Mapper.xml type-aliases-package: com.example.redis.pojo spring: datasource: username: root password: 123456 url: jdbc:mysql://localhost:3306/springtest?useSSL=false&serverTimezone=GMT%2B8&useUnicode=true&characterEncoding=utf8 driver-class-name: com.mysql.cj.jdbc.Driver tomcat: max-idle: 10 max-wait: 10000 max-active: 50 initial-size: 5 cache: type: redis redis: database: 0 host: localhost port: 6379 # 有密码填密码,没有密码不填 password: # 连接超时时间(ms) timeout: 1000ms # 高版本springboot中使用jedis或者lettuce jedis: pool: # 连接池最大连接数(负值表示无限制) max-active: 8 # 连接池最大阻塞等待时间(负值无限制) max-wait: 5000ms # 最大空闲链接数 max-idle: 8 # 最小空闲链接数 min-idle: 0
实体类 1 2 3 4 5 6 7 8 @Data @Alias ("user" )public class User implements Serializable private static final long serialVersionUID = 7760614561073458247L ; private Long id; private String userName; private String note; }
Dao层 1 2 3 4 5 6 7 8 9 10 11 12 public interface UserDao User getUser (Long id) ; int insertUser (User user) int updateUser (User user) List<User> findUsers (@Param("userName" ) String userName,@Param ("note" ) String note) ; int deleteUser (Long id) }
XML:
1 2 3 4 5 6 7 8 9 10 11 12 13 14 15 16 17 18 19 20 21 22 23 24 25 26 27 28 29 30 31 32 33 34 35 36 37 38 39 40 41 42 <?xml version="1.0" encoding="UTF-8" ?> <!DOCTYPE mapper PUBLIC "-//mybatis.org//DTD Mapper 3.0//EN" "http://mybatis.org/dtd/mybatis-3-mapper.dtd" > <mapper namespace ="com.example.redis.dao.UserDao" > <select id ="getUser" parameterType ="long" resultType ="user" > select id, user_name as userName, note from t_user where id = #{id} </select > <insert id ="insertUser" useGeneratedKeys ="true" keyProperty ="id" parameterType ="user" > insert into t_user(user_name, note) values(#{userName}, #{note}) </insert > <update id ="updateUser" > update t_user <set > <if test ="userName != null" > user_name =#{userName},</if > <if test ="note != null" > note =#{note}</if > </set > where id = #{id} </update > <select id ="findUsers" resultType ="user" > select id, user_name as userName, note from t_user <where > <if test ="userName != null" > and user_name = #{userName} </if > <if test ="note != null" > and note = #{note} </if > </where > </select > <delete id ="deleteUser" parameterType ="long" > delete from t_user where id = #{id} </delete > </mapper >
熟练的定义一个接口,同时也记得要在启动器中加入:
1 2 @EnableCaching @MapperScan("com.example.redis.dao")
@EnableCaching 记得一定要加,表示开启缓存。
Service层 1 2 3 4 5 6 7 8 9 10 11 12 13 14 15 16 public interface UserService User getUser (Long id) ; User insertUser (User user) ; User updateUserName (Long id, String userName) ; List<User> findUsers (String userName, String note) ; int deleteUser (Long id) }
1 2 3 4 5 6 7 8 9 10 11 12 13 14 15 16 17 18 19 20 21 22 23 24 25 26 27 28 29 30 31 32 33 34 35 36 37 38 39 40 41 42 43 44 45 46 47 48 49 50 51 52 53 54 55 56 @Service public class UserServiceImpl implements UserService @Autowired private UserDao userDao; @Override @Transactional @CachePut (value = "redisCache" , key = "'redis_user_'+#result.id" ) public User insertUser (User user) userDao.insertUser(user); return user; } @Override @Transactional @Cacheable (value = "redisCache" , key = "'redis_user_'+#id" ) public User getUser (Long id) System.out.println("service" ); return userDao.getUser(id); } @Override @Transactional @CachePut (value = "redisCache" , condition = "#result != 'null'" , key = "'redis_user_'+#id" ) public User updateUserName (Long id, String userName) User user = this .getUser(id); if (user == null ) { return null ; } user.setUserName(userName); userDao.updateUser(user); return user; } @Override @Transactional public List<User> findUsers (String userName, String note) return userDao.findUsers(userName, note); } @Override @Transactional @CacheEvict (value = "redisCache" , key = "'redis_user_'+#id" , beforeInvocation = false ) public int deleteUser (Long id) return userDao.deleteUser(id); } }
@Transactional表示是一个关于数据库的事务,能够控制数据库隔离级别和事务类型,这里先不详谈。
@CachePut表示将方法的结果放入缓存,比如你插入了一条数据后,就会返回一个布尔值,表示成功或是失败,如果成功,则放这条数据放入redis中。
value表示缓存库的名字是什么,要放入到哪个缓存区域去,key表示缓存的值,类似hashmap的形式,# 表示传入的参数。
@Cacheable能从缓存中通过定义的键进行查询,如果查询到数据,则返回,否则执行该方法,返回数据,并且将返回结果保持到缓存中,是使用最多的方法。
@CacheEvic 言简意赅,移除缓存。
Controller层 1 2 3 4 5 6 7 8 9 10 11 12 13 14 15 16 17 18 19 20 21 22 23 24 25 26 27 28 29 30 31 32 33 34 35 36 37 38 39 40 41 42 43 44 45 46 47 48 49 50 51 52 53 54 55 @Controller @RequestMapping ("/user" )public class UserController @Autowired private UserService userService = null ; @RequestMapping ("/getUser" ) @ResponseBody public User getUser (Long id) System.out.println("controller" ); return userService.getUser(id); } @RequestMapping ("/insertUser" ) @ResponseBody public User insertUser (String userName, String note) User user = new User(); user.setUserName(userName); user.setNote(note); userService.insertUser(user); return user; } @RequestMapping ("/findUsers" ) @ResponseBody public List<User> findUsers (String userName, String note) return userService.findUsers(userName, note); } @RequestMapping ("/updateUserName" ) @ResponseBody public Map<String, Object> updateUserName (Long id, String userName) User user = userService.updateUserName(id, userName); boolean flag = user != null ; String message = flag? "更新成功" : "更新失败" ; return resultMap(flag, message); } @RequestMapping ("/deleteUser" ) @ResponseBody public Map<String, Object> deleteUser (Long id) int result = userService.deleteUser(id); boolean flag = result == 1 ; String message = flag? "删除成功" : "删除失败" ; return resultMap(flag, message); } private Map<String, Object> resultMap (boolean success, String message) Map<String, Object> result = new HashMap<String, Object>(); result.put("success" , success); result.put("message" , message); return result; } }
好了,来测试一下吧。
测试 输入地址:
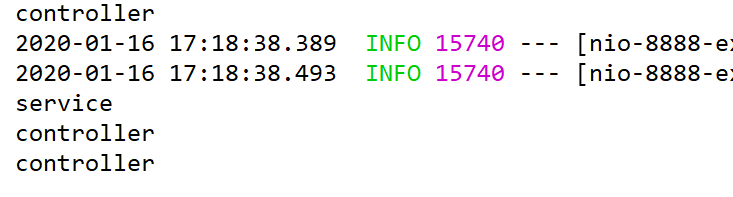
回去查看idea:
我们可以看到的是,在Controller层进行了访问,然后在Service层进行了访问,这表示是第一次读取这个值,需要访问数据库,并且在放入缓存中。
那么再多访问几次看看吧。
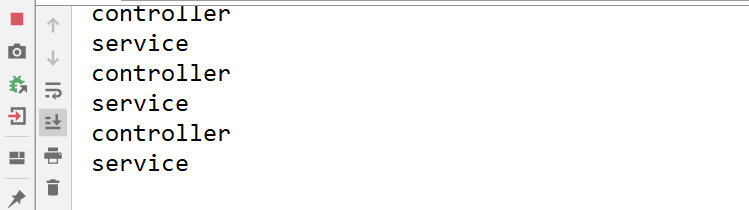
连续的页面刷新后,再去idea
我们发现,这只执行到Controller层,而不进行Service层,这表示了我们读取到的是缓存,而不是数据库,因为只执行Controller层便结束了。
Redis拓展 我们放入Redis的缓存,在不设置之前,是永久存在的。,如果缓存只会被放入,而不设置过期时间的话,就算有办法取消掉一些缓存,但随着时间的推移,总会有些缓存会被遗忘,一直作为内存的存在Redis当中。这时,就需要深入的配置Redis,让其能够主动的销毁。
设置缓存过期时间 加入configuration:
1 2 3 4 5 6 7 8 9 10 11 12 13 14 15 16 17 18 19 20 21 22 23 24 25 26 @Configuration public class RedisConfig @Autowired private RedisConnectionFactory redisConnectionFactory; @Bean public RedisCacheManager redisCacheManager () RedisCacheWriter writer=RedisCacheWriter.lockingRedisCacheWriter(redisConnectionFactory); RedisCacheConfiguration config=RedisCacheConfiguration.defaultCacheConfig(); config = config.serializeValuesWith(RedisSerializationContext.SerializationPair.fromSerializer(new JdkSerializationRedisSerializer())); config=config.disableKeyPrefix(); config=config.entryTtl(Duration.ofSeconds(10 )); RedisCacheManager redisCacheManager=new RedisCacheManager( writer,config); return redisCacheManager; } }
configuration会全局识别为SpringBoot的配置文件,使用@Bean注解,去把这个容器注入到SpringBoot中。
再去测试一下:
我这里是每15秒进行一次访问,可以发现,缓存都在10后会自动过期,都需要重新从数据库读取。
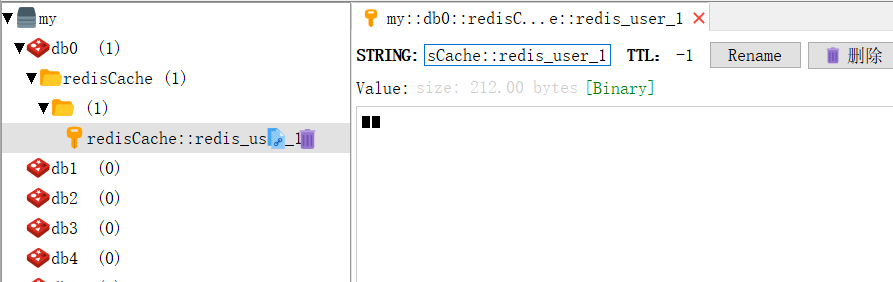
我们可以使用RedisDesktop去查看Redis到底存放了些什么:
项目地址:https://github.com/Antarctica000/SpringBoot/tree/master/redis