并发容器 一些常用的工具
ConcurrentHashMap:线程安全的hashmap。
CopyOnWriteArrayList:线程安全的ArrayList,比较适合读多写少的场合,完胜vector。
ConcurrentLinkedQueue:线程安全的队列,它们两之间的差别在于数据结构不一样,一个是类似于数组,更适合直接查找,一个则是像链表一样,更适合添加和修改。
BlockingQueue:一个阻塞队列,也是一个接口,通常用于数据共享的通道。
ConcurrentSkipListMap:线程安全的跳表。
–
ADD()操作
DELETE()操作
INSERT操作
INDEX取值操作
ITERATOR取值操作
ArrayList/Vector/Stack
好
差
差
极优
极优
LinkedList
好
好
好
差
极优
初步实现线程安全 想要保持HashMap的线程安全的话,出了手动使用synchronized包围之外,还能够调用一个类去实现它。
1
2
3
4
5
6
7
8
9
10
11
12
13
14
Map map= Collections.synchronizedMap(new HashMap<>()); SynchronizedMap(Map<K,V> m) { this .m = Objects.requireNonNull(m); mutex = this ; } List list=Collections.synchronizedList(new LinkedList<>()); SynchronizedList(List<E> list) { super (list); this .list = list; }
Objects.requireNonNull是判断有没有传入参数,mutex表示的是一个锁,表明要拥有这个锁的时候才能对map进行读取或写入,这样的话效率很低。
一个更好用的办法,就是用ConcurrentHashMap。
ConcurrentLinkedQueue ConcurrentLinkedQueue是在高并发环境下最好的队列了,队列经常被用于实际生活,比如消息队列,用餐的推送顺序,购票网站等,之前讲过的Java并发编程(六)的ArrayList线程不安全,我们用线程安全的代替试试:
1
2
3
4
5
6
7
8
9
10
11
12
13
14
15
16
17
18
19
20
21
22
23
24
25
26
27
28
import java.util.concurrent.ConcurrentLinkedQueue;public class test implements Runnable static ConcurrentLinkedQueue list=new ConcurrentLinkedQueue(); public static void main (String[] args) throws InterruptedException Thread t1=new Thread(new test()); Thread t2=new Thread(new test()); t1.start(); t2.start(); t1.join(); t2.join(); System.out.println(list.size()); } @Override public void run () for (int i = 0 ; i < 100000 ; i++) { list.offer(i); } } } 200000
我们看看ConcurrentLinkedQueue是如何实现的吧!
1
2
3
4
5
6
7
8
9
10
11
12
13
14
15
16
17
18
19
20
21
22
23
public ConcurrentLinkedQueue () head = tail = new Node<E>(null ); } private static class Node <E > volatile E item; volatile Node<E> next; ...... } boolean casItem (E cmp, E val) return UNSAFE.compareAndSwapObject(this , itemOffset, cmp, val); } void lazySetNext (Node<E> val) UNSAFE.putOrderedObject(this , nextOffset, val); } boolean casNext (Node<E> cmp, Node<E> val) return UNSAFE.compareAndSwapObject(this , nextOffset, cmp, val); }
队列里有head和tail两个值,分别代表的头结点和尾节点,头结点值永远不会为null,而我们正是使用头结点去遍历这个队列,每当有一个新的值入队的时候,都会从尾部入队,直接进入尾节点,从而只需移动尾节点便可以入队,极大的方便与插入和删除操作。而tail的更新情况并不一定是随时更新,而是可能会产生延迟,比如要进入了两个数值,尾节点才会移动到末尾。而我们入队的方法有两个,一个是add,一个是offer,但是实际上使用的都是offer。
1 2 3 4 5 6 7 8 9 10 11 12 13 14 15 16 17 18 19 20 21 22 23 24 public boolean offer (E e) checkNotNull(e); final Node<E> newNode = new Node<E>(e); for (Node<E> t = tail, p = t;;) { Node<E> q = p.next; if (q == null ) { if (p.casNext(null , newNode)) { if (p != t) casTail(t, newNode); return true ; } } else if (p == q) p = (t != (t = tail)) ? t : head; else p = (p != t && t != (t = tail)) ? t : q; } }
在if (q == null)这个判断中,如何q为空,可能队列为空,也可能加入新的节点,正常执行增加节点操作。但在队列为空时,p==t(即head=tail),因此不会执行castail()操作。
但在执行了第一个元素入队后,再执行第二个元素入队时,p的next不为空,于是就开始查找最后一个节点,执行 p = (p != t && t != (t = tail)) ? t : q; 使得p取下一个节点或最后的节点,于是p就成了链表的第一个元素。这个时候再进行循环,p的null(即第一个元素的next)为空,而此时的p不等于尾节点,于是变更新尾节点,使得尾节点移动至链表最后。
而出现特殊情况 else if (p == q) 出现的时候,便使用新的tail作为链表的末尾。
特殊情况是怎么诞生的呢?比如两个线程去读取队列的一个值,一个读取完了之后,另一个执行了修改,那么第一个线程再次去读取的时候,就会发生两次数据不一致的问题。就会出现一个(t != (t = tail))的情况,这时候,如果尾节点没有被修改,则返回head,重新查找尾节点。
看看出队的方法
1 2 3 4 5 6 7 8 9 10 11 12 13 14 15 16 17 18 19 20 21 22 public E poll () restartFromHead: for (;;) { for (Node<E> h = head, p = h, q;;) { E item = p.item; if (item != null && p.casItem(item, null )) { if (p != h) updateHead(h, ((q = p.next) != null ) ? q : p); return item; } else if ((q = p.next) == null ) { updateHead(h, p); return null ; } else if (p == q) continue restartFromHead; else p = q; } } }
但在执行了第一个元素入队后,再执行第一个元素出队时,此刻的tail并没有更新,所以会直接执行最后一个操作,使得p=q;就是说把头结点的值变为第一个节点的值,然后再循环,执行到 item != null && p.casItem(item, null) 此时的item元素不会为空,因为它现在是第一个节点,然后再将其cas交换,交换后,item值已经为空了,于是就不会等于h,然后执行 updateHead(h, ((q = p.next) != null) ? q : p);
1 2 3 4 final void updateHead (Node<E> h, Node<E> p) if (h != p && casHead(h, p)) h.lazySetNext(h); }
再把head和tail变为同一个元素。
CopyOnWriteArrayList CopyOnWriteArrayList常被用作于商品类目的展示,黑名单等各种读多写少的场景。但是它只能保证数据的最终一致性,不能保证数据的实时一致性,也就是说,被修改的值不一定能够被马上读到。我们来看看它的源码把。
1 2 3 4 5 6 7 8 9 10 11 12 public E get (int index) return get(getArray(), index); } final Object[] getArray() { return array; } private E get (Object[] a, int index) return (E) a[index]; }
这相当于每次都返回一个array[index]的内部数组,因为这个数组不会被修改,只能够被另一个array数组给替换,从而保证了原子性,所以就没有类似于synchronized和lock的加锁操作。
1 2 3 4 5 6 7 8 9 10 11 12 13 14 15 16 17 18 19 public boolean add (E e) final ReentrantLock lock = this .lock; lock.lock(); try { Object[] elements = getArray(); int len = elements.length; Object[] newElements = Arrays.copyOf(elements, len + 1 ); newElements[len] = e; setArray(newElements); return true ; } finally { lock.unlock(); } } final void setArray (Object[] a) array = a; }
一开始便设置了一个重入锁,进行了加锁操作,然后没增加一个新元素,都会创建一个新的数组,然后使用setArray去改变这个数组的值,由于整体都加了锁,所以不会影响到原子性,其次array变量是一个volatile类型。
1 private transient volatile Object[] array;
所以被修改后,其他线程会被察觉到并将其修改,保证可见性和有序性。
BlockingQueue 之前在写线程池的时候,介绍过四个任务队列,它们都有一个共同的特点就是都具有阻塞功能,因为它们都来自于一个接口BlockingQueue
1 2 3 4 5 6 7 8 9 10 11 12 13 14 15 16 17 18 19 20 21 22 23 24 25 26 public interface BlockingQueue <E > extends Queue <E > boolean add (E e) boolean offer (E e) void put (E e) throws InterruptedException boolean offer (E e, long timeout, TimeUnit unit) throws InterruptedException ; int remainingCapacity () E take () throws InterruptedException ; E poll (long timeout, TimeUnit unit) throws InterruptedException ; boolean remove (Object o) public boolean contains (Object o) int drainTo (Collection<? super E> c) int drainTo (Collection<? super E> c, int maxElements) }
而我们就以ArrayBlockingQueue为例。虽然说ArrayBlockingQueue和concurrentlinkedqueue也有offer方法和poll方法,但是ArrayBlockingQueue由于继承的是BlockQueue,所以还有两个独有的方法,那就是put和take。
这有什么区别呢?可以猜的到这两个方法具有阻塞功能,就以offer方法和put方法来对比。
1 2 3 4 5 6 7 8 9 10 11 12 13 14 15 16 17 18 19 20 21 22 23 24 25 26 27 28 29 30 31 32 33 34 35 36 37 38 39 40 41 42 43 44 45 46 47 public boolean offer (E e) checkNotNull(e); final ReentrantLock lock = this .lock; lock.lock(); try { if (count == items.length) return false ; else { enqueue(e); return true ; } } finally { lock.unlock(); } } public void put (E e) throws InterruptedException checkNotNull(e); final ReentrantLock lock = this .lock; lock.lockInterruptibly(); try { while (count == items.length) notFull.await(); enqueue(e); } finally { lock.unlock(); } } private E dequeue () final Object[] items = this .items; @SuppressWarnings ("unchecked" ) E x = (E) items[takeIndex]; items[takeIndex] = null ; if (++takeIndex == items.length) takeIndex = 0 ; count--; if (itrs != null ) itrs.elementDequeued(); notFull.signal(); return x; } private final Condition notEmpty; private final Condition notFull;
它们之间最为明显的差别就是,offer在队列已经满的时候,直接返回一个false,而put方法则是使用了condition.await去阻塞这个线程继续运行,等待另一个dequeue方法,移除一个元素出队后,再去唤醒put方法,使其继续将未能加入线程的元素继续加入进去。
同理,take方法也是如此
1 2 3 4 5 6 7 8 9 10 11 12 13 14 15 16 17 18 19 20 21 22 23 24 25 26 27 28 29 30 public E poll () final ReentrantLock lock = this .lock; lock.lock(); try { return (count == 0 ) ? null : dequeue(); } finally { lock.unlock(); } } public E take () throws InterruptedException final ReentrantLock lock = this .lock; lock.lockInterruptibly(); try { while (count == 0 ) notEmpty.await(); return dequeue(); } finally { lock.unlock(); } } private void enqueue (E x) final Object[] items = this .items; items[putIndex] = x; if (++putIndex == items.length) putIndex = 0 ; count++; notEmpty.signal(); }
使用take想要获得队列首部信息的时候,如果没有值,便发生阻塞,直到有元素入队,使用notEmpty方法唤醒为止。
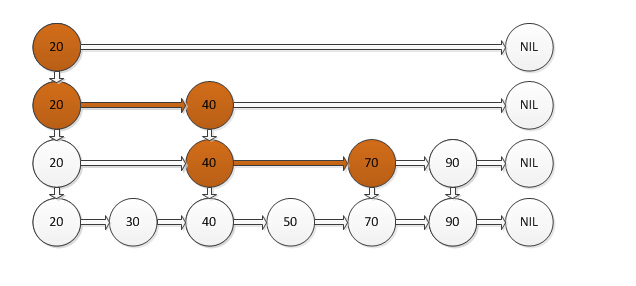
ConcurrentSkipListMap 跳表(SkipList),是除了哈希表(HashTable)以外,一个非常特别的表。哈希图是用哈希表去实现的,那么跳表也有对应的map结构,那就是跳图(ConcurrentSkipListMap),这个ConcurrentSkipListMap非常的神奇,这是一个用空间去换时间的算法,它的数据结构如下:图片资源来自于:http://www.liuhaihua.cn/archives/40657.html
顶层有着很少的数据和很大的区间,然后往下走,数据越密,区间越小。每个节点都有key值和value值,它的运行机制如下:当你要寻找一个key值的时候,从顶层开始找,如果需要找的key值小于当前节点,便继续前进一个节点,如果需要找的key值大于当前节点,便直接进入当前节点的下一层继续寻找,如果需要找的key值等于当前节点,便返回当前节点的value值。
如图所示,如果你要找的值为70,从顶层开始找,大于20往下,大于40再往下,小于40则往前,最后找到了目标值70。
1 2 3 4 5 6 7 8 9 10 11 12 13 14 15 16 import java.util.Map;import java.util.concurrent.ConcurrentSkipListMap;public class test public static void main (String[] args) Map<Integer,String> s=new ConcurrentSkipListMap<Integer,String>(); for (int i = 0 ; i <30 ; i++) { s.put(i,"i am " +i); } for (Map.Entry<Integer,String> e:s.entrySet() ) { System.out.println(e.getKey()); } } }
我们看看它的源码构成:
1 2 3 4 static final class Node <K ,V > final K key; volatile Object value; volatile Node<K,V> next;
每一个节点除了自己的key和value,还有下一个节点的next,类似于链表
1 2 3 4 5 6 7 boolean casValue (Object cmp, Object val) return UNSAFE.compareAndSwapObject(this , valueOffset, cmp, val); } boolean casNext (Node<K,V> cmp, Node<K,V> val) return UNSAFE.compareAndSwapObject(this , nextOffset, cmp, val); }
都使用CAS操作去保证原子性
1 2 3 4 static class Index <K ,V > final Node<K,V> node; final Index<K,V> down; volatile Index<K,V> right;
特别是这个index,定义了本身节点,右节点和下节点,这三个节点,这将其数据结构的实现联系到了一起,看看构造函数:
1 2 3 4 5 6 7 8 9 10 11 12 13 14 15 16 17 18 19 20 21 public ConcurrentSkipListMap () this .comparator = null ; initialize(); } private void initialize () keySet = null ; entrySet = null ; values = null ; descendingMap = null ; head = new HeadIndex<K,V>(new Node<K,V>(null , BASE_HEADER, null ), null , null , 1 ); } static final class HeadIndex <K ,V > extends Index <K ,V > final int level; HeadIndex(Node<K,V> node, Index<K,V> down, Index<K,V> right, int level) { super (node, down, right); this .level = level; } }
这个HeadIndex的三个参数分别是需要寻找的目标节点的移动,和当前节点的本身的值和右值和下值,最后一个参数表示了层数。这个构造函数是整个SkipMap的核心所在。